วันจันทร์ที่ 9 พฤษภาคม พ.ศ. 2554

[How To] Gundam Model Kits Weathering Tutorial

This post will show you how to give weathering effect to your Gundam model kits. First of all, Im still new and Im sure there’s a lot of better weathering master out there, but in this post i think my knowledge will help you give a reference how to give your Gundam a weathering effect.
First of all, you need plastic model.
Gundam Model Kits Weathering Tutorial 01.jpg
For first step, spray flat coat to your part, I use Mr. Hobby – Mr. Super Clear Flat.
Gundam Model Kits Weathering Tutorial 02.jpg
After that prepare a lot of cotton bud, enamel paint and thinner.
Gundam Model Kits Weathering Tutorial 03.jpg
Add enamel paint directly to your cotton bud
Gundam Model Kits Weathering Tutorial 04.jpg
Apply your cotton bud into the parts, add to every corner and panel lines.
Gundam Model Kits Weathering Tutorial 05.jpg
After dry, apply a bit of flat top coat again and prepare rough brush with grey enamel paint.
Gundam Model Kits Weathering Tutorial 06.jpg
Give your brush a bit of grey enamel paint, try to apply it in tissue or dry cloth to prevent excess paint in your parts, this technique is called dry brushing
Gundam Model Kits Weathering Tutorial 07.jpg
Brush it to your part and the result will look like this.
Gundam Model Kits Weathering Tutorial 08.jpg
Too messy? Too dirty for your taste? No problem, apply enamel thinner to cotton bud and gently clean your parts, end result should be look like this.
Gundam Model Kits Weathering Tutorial 09.jpg
Ta da! Actually, I create this tutorial in a forum long time ago, so if there’s a better way to do it, feel free to apply to your Gundam Model Kits. Good luck! ^^;

credit : http://www.gundammodelkits.com/how-to-gundam-model-kits-weathering-tutorial.html

Adding Rivets to your Mechs

Adding Rivets to your Mechs
One simple mod to add to your MS to make them look more realistic is rivets. Rivets can break the bland look of large flat surfaces and they look even better when dry-brushed over. You can purchase some from Wave, but those are pretty large. To make your own, you will need:
  1. Styrene rod (the thinner the better... I use one 0.6mm in diameter)
  2. Liquid Cement
  3. Sharp hobby knife (a new blade is a good idea)
  4. Pencil (optional)
  5. Sandpaper (optional)
Here's how to do it:
  1. Use the pencil and mark down where you want your rivets to be. Check out pictures on the net if you need references. Normally I put mine about 1-2mm from the edges or 'armor plates'. Skip this step if you think you can tell exactly where to put your rivets without markings.
  2. Use the sharp hobby knife to carefully cut off a small section of the styrene rod - about 0.5mm in length or less. This will take some practice, but it's not too difficult. Try to ensure a good cut that gives you a right-angled edge.
  3. Use the tip of your blade and just press very gently onto one of the flat surfaces of the little piece you've cut off. The blade will 'pick' up the little rivet.
  4. Using the brush applicator of your liquid cement bottle, just touch the other flat surface of the rivet to apply some glue.
  5. Touch the glued surface of the rivet to the marked spot on your model. The glue will stick the rivet in place.
  6. Allow the glue to dry and then you can use sandpaper to lightly sand down the rivet - this is good if your rivets are all of visibly different lengths or if some of the cuts were not very straight.
Here's a pic of some rivet-work I was recently working on...
   credit : http://gundam_base.tripod.com/

Achieving a 'Rough' Texture on your paint jobs

Achieving a 'Rough' Texture on your paint jobs
I once saw a very cool MG Gelgoog in the hobby store which had a very rough texture on its armor. It looked really cool and realistic and for the longest time I just could not figure out how the effect was achieved. I tried multiple primer laters but that didn't work and sanding with various rough grades of sandpaper didn't work either.
I finally discovered how it was done. I was using the wrong primer. I had been using Mr. Surfacer1000 from Gunze Sangyo but what I really should have used was Mr. Surfacer500! It turns out that the numbers refer to how 'fine' the spray particles are so a lower number results in a much rougher finish.
Be careful though, if you spray too many layers of Mr. Surfacer500, you can lose the details on your models very fast so use sparingly. This was what I used to achieve the effect on my RX-93 below.
credit : http://gundam_base.tripod.com/

Modified Shoulder Joint for 1/144 kits

Modified Shoulder Joint for 1/144 kits
I did this mod for the 1/144 HG Ez8. In my opinion, poseability of many 1/144 kits really suffer from the lack of this joint... so I decided to try to do something about it. Here's what was used:
  • plastic sheet (1.3mm) - anything more than 1mm should be fine.
  • 3mm drill bit
  • 2 spare polycap A from a HGUC kit
  • Some spare sprue from a plastic tree about 3mm in diameter
  • hobby blade
  • glue
I can't give you exact measurements cos they'll differ from kit to kit but with a little common sense and a good ruler you'll figure it out. What I wanna give you is just the idea/concept of what to do. Here goes:
1. Depending on the width of the chest of the mech, cut the plastic sheet to form the following structure on the right; it's basically 2 long strips with 3 pieces providing support in between. The space between the 2 long strips should be the outer diameter of the polycap (mine was 5mm):
Front
Back
2. Next, drill 2 holes on each of the long strips to fit the polycaps (mine was 3mm)
3. Assemble and glue the whole structure together as in the diagram above.
4. Cut the sprue to make extensions to fit the shoulders of the kit as below:
4. Now cut the chest pieces to allow the whole assembly to fit inside and move freely.
5. Glue the assembly in place and you're done!
The desired result can be seen in this little animated pic.

credit : http://gundam_base.tripod.com/

Adding Embossed Markings to your Mechs

Adding Embossed Markings to your Mechs
Although the picture below isn't clear (I'm still looking for a reasonably priced Digicam), check out the embossed markings on my PG Zaku which identifies which type mech it is...

It says MS-06F...
It's very cool and very military looking. How did I do it? The tip comes from one of the Japanese hobby magazines.
  1. Look at the runners on your models and you'll find that they'll have almost all the letters you need. For the mech type, it's normally embossed on all the runners - sometimes with different fonts and sizes
  2. Decide which letters you will want to use
  3. With a sharp hobby blade (I recommend a new one), carefully cut under the letter to remove it. Because the letters are so thin, they'll curl when you cut them out - I recommend cutting from one direction till about half-way through, then carefully use a flat object to press the curled portion back down, then cut the other half from the other direction.
  4. After cutting all your letters, carefully glue them to your model. I used a piece of masking tape as a guide.
Now the letters are very thin and this is a delicate process so try it out first on a letter you don't want and please *be very careful* with the hobby knife. However, with a little patience you will be rewarded with a very cool looking ID on your mech.
It'll look even better painted and dry-brushed to bring out the contrast!

credit : http://gundam_base.tripod.com/

Making your own Heavy User Parts

Making your own Heavy User Parts
Some Gundam MG models come with additional parts for you to customize your mech - like handles and vents. While vents are available from WAVE under their Wave Option Parts line, you can make cool handles on your own.
  1. Buy some thin brass tubes/rods (For Singaporeans: available from Art Friend Crafts shop at Bras Basah Complex)
  2. Cut the length you need with a pair of wire cutters
  3. Bend to desired shape - I use a pair of long-nose pliers
  4. Glue to part - I use superglue.
For added strength, I normally drill small holes first to insert the part before gluing
You can see how the end product looks on my PG Zaku here...
credit :http://gundam_base.tripod.com/

Future Floor Polish: Polishing Scratches off Clear Parts

Future Floor Polish: Polishing Scratches off Clear Parts
Thanks to David Bauer for this tip.
"Most Master Grade and High Grade kits now come with clear parts for the beam sabres, eyes or mono-eye visors. Sometimes after use or during construction the clear parts get small (sometimes large) scratches on the part either through sprue attachment points or accidents!
Not to worry. Mount the part onto a toothpick and simply dip the parts in Future Floor Polish or in any other acryllic floor polish. Let the part dry (I reccomend overnight) and the scratches will be gone. The acryllic material in the polish fills in the scratches.

Also dipping clear parts in acryllic floor polish will protect the part from fogging if you use super glue on them.

Acryllic polishes uses are not just limited to clear parts. Try dipping the blade of a painted beam sabre into the polish for a bright shine!
"
Additional Note:
This was taken from G-man's post on the Machine Mess Forum.

Future Floor Wax has other uses too:
  1. Dunk canopies/clear parts in it for brilliant shine.
  2. Airbrush onto matt paint to create gloss surface without the smell, prep for decal adhesion since decals prefer gloss surfaces.
  3. Airbrush OVER it AFTER decal has set(about 2 days to be safe) to seal it. Alternatively, can be mixed with Tamiya Flat Base at a Future to Flat Base ratio of 7:3 to 8:2 to create flat overcoat. Always experiment on unwanted model!
Works great in levelling out brush strokes of hand-painted models, though of course, brush strokes should not be too er... obvious. 

credit : http://gundam_base.tripod.com/

Dry Transfers: How to Apply them

Dry Transfers: How to Apply them
Most Master Grade kits come with a set of normal stickers (peel and stick) and dry transfers (I'll refer to them as 'DT's). When used correctly, DTs look a lot better than normal stickers because they stick so much closer to the surface of the model they actually look painted on.
It took me a while to figure out how to get these done right. Here's how I do them:

  1. Set the whole DT sheet on a cutting mat. Flip it over so the adhesive edge is upwards towards you.
  2. Use a sharp hobby blade (I normally use a new one) to cut out the design you want to use with at least 1mm of space around it.
  3. Remove the rest of the DT sheet you won't be using and carefully flip the cut-out portion over so the adhesive edge is now on the cutting mat.
  4. Cut a small piece of cellophane tape.
  5. Position the tape over the DT so that the DT sits in the middle, then stick it on.
  6. Carefully position the tape with DT where you want it on the model, then paste it on.
  7. Use a pen or blunt pencil to go over the DT. Go over it a few times in different directions. Check to ensure you have the whole symbol/marking covered.
  8. Careflly lift the tape off from one end. As you remove it, check to see if the transfer has stayed on the model. If not, the tape allows you to position the DT over the same area again (or at least close to it) to finish your job.
  9. Remove tape and you're done!
A few notes:
  • this works well on painted and non-painted surfaces.
  • test the cellophane tape first. I can't guarantee that different brands will work equally well. I wouldn't recommend cheap brands if they leave glue or residue on the surfaces after removal.
  • do *not* stick the cellophane tape over any DTs already applied... they may pull them off! If you have 2 DTs to be placed close together, stick them both on the tape first and apply them together. 
  • credit : http://gundam_base.tripod.com/

**Easier, Better Finish using... Women's Fingernail Buffers???

**Easier, Better Finish using... Women's Fingernail Buffers???
Yeah baby! Thanks to David Bauer for this tip.
It is always a pain trying to remove the "nubs" left from cutting parts from the sprue and sanding seams left on the model after gluing and puttying. Sandpaper can leave small scratches that show up during painting.
I use women's three stage fingernail buffers. They can be bought in the cosmetics department a most stores for around a $1 to $1.50 .They come in in packages of three stick. One coarse (like 400 grit sandpaper) , a buffer stick, This one polishes the scratches out. And finally a polishing stick. This one gives the part a high shine. I have given silver plastic almost mirror shines with these.
The buffers come in various sizes and are made of a stiff rubber like plastic so they can bend around small curves. Best of all parts can be cleaned up really quick. They are also avaliable in various sizes. You can even cut them into different sizes and shapes to suite your needs. I hope this helps. This one saves me a lot of time.

credit : http://gundam_base.tripod.com/

'Ringlets' on Zakus, Goufs and other Zeon Mechs: An easier way

'Ringlets' on Zakus, Goufs and other Zeon Mechs: An easier way
When working on the conductive cables zeon mechs like Zakus and Goufs, it's normal to not just spend a lot of time... you'll probably end up with sore fingers too. Here's a tip to help you out... you'll need a hobby drill, a little stick and sandpaper.
  1. Remove 'ringlet' from parts tree.
  2. Cut off as much of the sprue as possible (I use a nail-clipper for all my sprue cutting)
  3. Use a stick and shape it so that the ringlet fits on it snugly (a little masking tape might make it a better fit).
  4. Put the stick in your hobby drill if you have one, and turn it on (slowest setting if it's a variable speed).
  5. Now you can carefully sand the piece and it'll come out nice and cylindrical. No fuss.
It still takes some time, but it is faster and a lot easier on your fingers.

credit : http://gundam_base.tripod.com/

How to Fill Seams with Putty

How to Fill Seams with Putty
Different people use putty in different ways but here's how I do it:
  1. glue the parts together
  2. allow to dry
  3. squeeze out a little putty (I do so on a piece of paper)
  4. use a toothpick (I use an old hobby blade - RECYCLING MAN! lol!) and apply the putty to the seam, trying to ensure that it goes into the gaps. Note: Don't apply too much cos you'll take more time cleaning it up later... but not too little cos you'll have to re-do it. Generally you'll end up with a messy line of putty covering up the seam - don't bother to smooth it out too much at this stage...
  5. allow to dry (check your putty for curing time) but remember that even though the outside may feel solid if you have a thick application of putty the inside may not be fuly cured yet.
  6. use hobby knife to remove excess dried putty till close to the seam
  7. use sandpaper to smoothen - I normally start with 400-600 and end off with a 1000 grit paper. Clean the part before painting (soap and water is nice).
Update:
Here's a tip contributed by Stephen Lee.

"You can actually squeeze putty and mix it with Mr Thinner and it will become a softer paste (you can use a brush and paint it on), but beware of adding too much or it will become too mushy."

credit : http://gundam_base.tripod.com/

Seam Filling - Quick and Without Putty!

Seam Filling - Quick and Without Putty!
I use putty for a lot of my seam filling but for gaps which aren't too huge this is a good trick that's fast and also very effective. You need to buy yourself a tube of superglue and a superglue accelerator - the accelerator is a solution you can spray over your superglue to make it cure (or harden) faster.
Apply superglue to one of the 2 pieces to be joined. Then assemble the 2 pieces together. There should be just enough glue so that when you join the 2 pieces a little of the glue 'bulges' out from the seam. Then spray your accelerator on the joint.
Leave for about 5 minutes and your joint should not only be strong, the glue also fills up all the gaps. Now use your hobby knife to remove the access hardened glue and sand to a smooth finish.
I've found this method to be not only faster than putty, but I think it's stronger too. Try it!
Some guys have asked me what brands of superglue and accelerator I use... I use ALECO 110 superglue because it was on sale - basically any brand of cyanoacrylate adhesive will do. As for the accelerator, I use GRIP Cyano Activator (For Singaporeans, available at Hobby Focus at Far East Plaza).

credit : http://gundam_base.tripod.com/

Spray Painting with Sticks

Spray Painting with Sticks
For spray-painting, you can get a stick (or even a tooth-pick), and attach an end of it to an un-exposed portion of the part you are about to paint.
You can then hold the stick and spray the piece to be painted. After that, stick the other end of the stick into a piece of styrofoam and leave to dry.
It's a little more time-consuming... but it's clean and you can handle your parts without being afraid of messing up the paintwork. :)

credit : http://gundam_base.tripod.com/

Painting Chrome Parts

Painting Chrome Parts
Today I painted the chrome pistons on my PG Zaku. Here's what I discovered:
  • Painting directly on the chrome doesn't work.
  • Painting primer over the chrome (suggested by a fellow modeller) doesn't work... at least not for me.
What did work?
Well, I masked the part of the chrome I didn't want removed and then applied some hobby thinner to some tissue paper and rubbed the chrome off. I got most of it off this way - what little was left was removed by scraping with my hobby blade. Note: You can also use industrial thinner but I'd recommend that you test the thinner on a spare sprue first because some are too strong and will melt the plastic. Stick to hobby thinner to be safe.
To paint, I tested some primer but it didn't adhere really well to the surface which was surprising to me. I found that my Gunze Sangyo Steel colored paint (Mr. Color no.28) went on pretty well. Since I was spraying the parts copper, the metallic steel base worked fine. The result is a nicely painted part. Check out the pics. :)
painted pistons
Update:
The tip above is good when you need to remove a portion of the chrome from a part but not all of it. If you want to remove all the chrome, try this simpler method. This little add-on tip was contributed by David Bauer, I edited it a little.

"I noticed you said you used thinner to remove the chrome plating from the parts. I had a similar problem with the 1/100 scale Wing Gundam kit. About 15 parts are chromed in a gold color. The chest vents have a very fine mesh detail in the plastic. I would never be able to get the chrome out of there! Besides, the thinner might clog the part and make it look worse!

The best way to get rid of chrome plating is bleach..... Yep good old laundry bleach. Just drop the parts in a cup of bleach and let it sit over night. In the morning there will be a chrome film floating at the top of the cup and all the chrome will be off the parts! It even gets it out of the tiny cracks and details and desolves it. The best part is that there is no work involved. You may want to test it on a piece of the chromed sprue first. some brands of bleach are stronger that others. I use Clorox."


credit : http://gundam_base.tripod.com/

การล้างสีด้วยน้ำมันเบรกแบบง่ายๆครับ

ล้างสีด้วยน้ำมันเบรก ล้างสีกระป๋องและสีที่ทำพลาด ออกได้เอี่ยมมาก แถมล้างพวก สีอีนาเมลด้วยเช่นกัน  แถมไม่กัดพลาสิกมากด้วย(แต่ทำให้พลาสติกด้านไปเลยนะ)
ที่สำคัญคือราคาประหยัดครับ ใช้งานก็ง่าย


น้ำมันเบรกผมใช้ยี่ห้อนี้ครับกระป๋องเท่าไหร่ไม่รู้ (ไปตบมาจากบ้านเพื่อน  nasty ) แต่ใช้ได้นานพอสมควร


ชิ้นส่วนที่ทดลอง ดาบ GN 2 ของ OO 1/100


หักมันหน่อยจะโดนน้ำมัน แล้วก็แช่ไว้เลย ผมแช่ทิ้งไป2-3ชั่วโมงเลย นะ จนสีหลุดออกมาเองเลย


พอเอาขึ้นมาแล้วล้างด้วยน้ำสะอาดอีกรอบนึงจะเห็นว่า เอี่ยมเลย แถมพลาสติกไม่เละด้วย

ดีเทลต่างๆยังคงครบถ้วน  ยังคงสภาพเดิมไว้จะก็แต่ เนื้อสีมันด้านไปเลยครับ (ในรูปผมหักดาบก่อนจะลงแช่นะครับ)

ส่วนใช้ยี่ห้ออื่นก็น่าจะใช้ได้นะครับ ส่วนใช้ได้กับโมจีนมั้ย ผมไม่แน่ใจเพราะผมไม่เคยลองครับ

ลองทำกันดูเลยนะครับเพราะใช้งานง่ายและประหยัดพอสมควร

ที่มา : http://www.thaigundam.com/forum/index.php?topic=19795.0

มาหัดก็อปชิ้นงานด้วย "ยางลบกึ่งสำเร็จรูป" อัพเดทเพิ่มรูปแม่พิมพ์ประกบสามชิ้น (โหลดโหดหน่อยนะคับ ^^)

เจ้าวัสดุชนิดนี้ผมเห็นครั้งแรกในเวบโมเดลของชาวญี่ปุ่น มีหลายเวบที่ใช้เจ้าวัสดุนี้ ทีแรกไม่รู้ว่ามันคืออะรได้วยซ้ำ
ว่ามันคืออะไร ลักษณะที่เห็นคือเป็นก้อนๆคล้ายดินน้ำมันใสๆบ้าง มีหลายสีบ้าง
บางทีก็โปะอยู่บนชิ้นงานที่จะทำการลอกแบบบางครั้งก็เห็นมีโพลีเอสเตอร์พุตตี้ที่เป็นชิ้นงานแล้วอยู่ด้านใน
บางครั้งก็เป็นเรซิ่นทั้งใสและทึบอยู่ในแม่พิมพ์ แต่ก็ยังไม่รู้ว่าเจ้าวัสดุปริศนานี่คืออะไรอยู่ดี งานที่เห็นบ่อยที่สุด
ก็คือก็อปหน้าเน็นด๋อยทั้งหลายนี่แหละ พอดีมีอยู่เวบหนึ่งเขาเอามาเจ้าวัสดุที่ว่านี้มาให้ดูทั้งห่อ เออแฮะ หน้าตาแบบนี้เอง
สีก็สวยดี แต่ก็ไม่รู้ว่าจะไปหซื้อมาจากที่ไหนอยู่ดี เพราะดูแล้วมันไม่น่าจะอยู่ในสาระบบของวัสดุและอุปกรณ์
ที่ขายในเวบทำโมเดลของบ้านเราเลย (ก็แหงละ มันเป็นสิ้นค้าที่เอาไว้ทำงานฝีมือเด็กสำหรับเด็กประถมนี่นา)

พอดีเมื่อเดือนที่แล้วผมไปที่ร้านไดโซะทุกอย่างราคาเดียว(เชียงใหม่นะ) ก็ไปเจอเจ้านี่โดยบังเอิญก็ซื้อมา1ซอง
โดยที่ผมก็ไม่แน่ใจว่าจะเป็นวัสดุแบบเดียวกันหรือเปล่า ซื้อมาก็วางเอาไว้กับกองโมเดลจนลืม
วันนี้เลยทำการทดสอบซะเลยครับ

มาดูเจ้าวัสดุลึกลับที่ว่ากันเลยครับ

เจ้าวัสดุนี้ที่ร้านไดโซะเรียกว่า "ชุดทำยางลบใช้เอง" จะแขวนอยู่ที่แผนกเครื่องเขียน ราคาก็ราคาเดียวทั้งร้าน

หน้าตาเป็นซองๆแบบนี้ครับ

เจ้าวัสดุนี้เป็นของบ. hinodejashi เวบไซดก็ตามนี้ครับ http://www.hinodewashi.co.jp/index.php

ถ้ามตามไปดูที่ บ.ผู้ผลิตจะพบว่าไม่มีอะไรเกี่ยวข้องกับการทำโมเดลเล้ยจริงๆ

ต่อมา เรามาดูด้านในของเจ้านี่กันเลยครับ

���ายในประกอบด้วย ถาดแม่พิมพ์รูป โลมา1ชิ้นจริงๆแล้วมีหลายแบบ ทั้งน้องหมีทั้งน้องหอย และเป็นที่แน่นอนว่า
เราจะไม่ใช้แม่พิมพ์นี้ ส่วนต่อมาจะเป็นกล่องใส่เจ้ายางลบกึ่งสำเร็จรูปที่ว่านี้ 1กล่องมีเจ้ายางนี่อยู่2ชิ้น
ที่เห็นว่ามีเจ้ายางนี่อยู่สองสีนี้ไม่ได้มีผลอะไรเลยต่อการทำงานนอกจากเรื่องความสวยงามเท่านั้น

หน้าตาชัดๆเป็นแบบนี้ครับ

ขนาด 1.5cmX6.5cm หนาประมาณ7mm.

จากนั้นตัดออกมาเป็นชิ้นเล็กๆ เพื่อเอาไปทำการทดสอบคุณสมบัติทางกาย���าพทั่วๆไปก่อน


มาดูกันชัดๆครับ

เจ้ายางนี้จริงๆแล้วเป็นเม็ดยางใสๆอัดเป็นแท่งสีเหลี่ยม แต่ละเม็ดจะถูกเคลือบด้วยสีต่างตามที่ผู้ผลิตใส่มา
แต่จะมีอีกแบบหนึ่งคือจะมีกากเพชรใส่มาด้วย สีสวยดีนะผมว่า

ลักษณะทั่วๆไปตอนนี้คือ จับดูแล้วผิว���ายนอกเรียบ แต่ไม่ลื่น ไม่สาก และไม่มีกลิ่น

จากนั้นเราจะเริ่มทำการทดลองใช้งานแล้วครับ
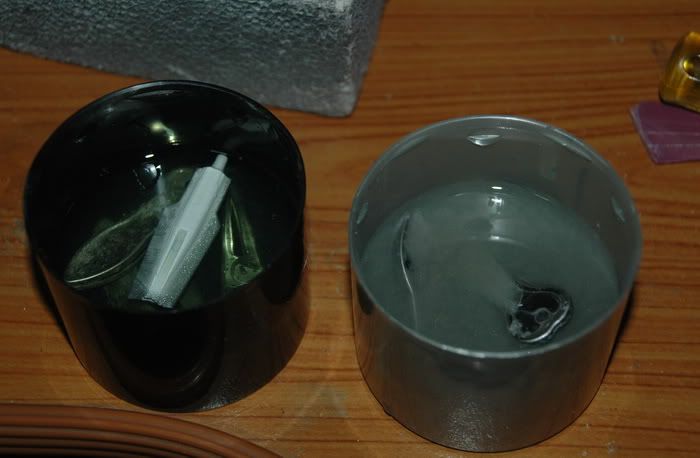
เจ้านี่จะทำงานได้โดยการต้มครับ ต้มจริงๆครับเหมือนมาม่านั่นแหละ เอาหม้อมาตั้งน้ำให้เดือด
แล้วหลังจากนั้นเอาเจ้ายางนี่ไปต้มประมาณ2-3นาที

เอ้า ต้มครับต้ม เจ้ายางสองชิ้นอยู่ในวงสีเหลืองๆครับ ความร้อนที่ต้องการแค่80องศาเซลเซียสเท่านั้น

นีคือส���าพหลังจากต้มแล้วครับ

ดูจากส���าพตอนนี้แล้วสีที่เคลือบเม็ดยางเอาไว้เริ่มละลายผสมกับตัวยางแล้ว สีจะเข้มขึ้นและสวยขึ้นอย่างเห็นได้ชัด
ยางสองชิ้นเมื่อโดนความร้อนก็เริ่มจะนิ่ม ถึงนิ่มมาก (ไม่ได้ละลายเน้อ) จากนั้นก็ทำการนวดยางทั้งสองก้อนเข้าด้วยกัน
จากการจบเจ้ายางนี้หลังจากต้มพบว่ามันนิ่มแบบแปลกๆ ไม่เหมือนดินน้ำมัน ไม่เหมือนดินเยื่อกระดาษ ไม่เหมือนเทียนไขที่ละลาย
ไม่เหมือน Epoxy putty

และที่สำคัญคือเจ้านี้ทั้งตอนก่อนต้มแและหลังต้ม ไม่มีกลิ่นใดๆเลย (เทียบกับซิลิโคนแล้วฟ้ากับเหวชัดๆ)

ผมทำการทดสอบโดยการเอาเจ้ายางที่ว่านี้ โปะเข้าไปกับกล่องใส้ดินสอกดตามรูป

ในรูปจะเห็นว่ายางที่นวดแล้วกลายเป็นสีเขียว เนื่องจากยางสีเหลือง+ยางสีน้ำเงิน เลยออกมาเป็นสีนี้
จากนั้นเราก็รอให้ยางมันเย็นตัวลง แต่ถ้าใครใจร้อนจะเอาไปจุ่มลงในน้ำผสมน้ำแข็งก็ได้ผมก็ทำแบบนั้นนะ

จากนั้นก็ถอดเอายางออกมา

เท่าที่เห็นตอนนี้คือเนื้อยางมีลักษณะโปร่งแสงไม่มาก การเก็บลายละเอียดของต้นแบบอยู่ที่
90-95%เลยทีเดียว และที่แน่นอนลายนิ้วมือของผมก็โดนเก็บไปด้วยเยอะแยะ

หลังจากที่ยางแม่แบบเย็นตัวแล้วผมลองบีบดูพบว่าเนื้อยางนิ่มนิดหน่อยสามารถบีบไปมาได้ตามรูป


จากนั้นผมทำการทดสอบกับวัสดุที่เราใช้กันบ่อยๆในการทำโมเดลก็คือ

1 Epoxy putty
2 Polyester putty
3 Resin

โดยผมเอาวัสดุทั้งสามชนิดใส่ลงไปในแม่พิมพ์ยาง

ผลการทดสอบเป็นออกมาดังนี้

วัสดุทั้งสามชนิดไม่ติดกับผิวหน้าของยางแม่พิมพ์เลย ตัวแม่พิมพ์ยางและวัสดุทดสอบทั้งสามชนิด
ไม่ทำปฏิกิริยาทางเคมีต่อกัน การเสื่อมส���าพ สีตก เปลี่ยนสี แข็งกรอบ กลิ่นแปลกๆ การกัดกร่อน
การเผาไหม้ สิ่งเหล่านี้ไม่ปรากฏให้เห็นเลยครับ

จากนั้นเรามาดูเนื้องานที่ทดสอบในขั้นต้นเลยครับดูตามรูป

1 Epoxy putty

ไม่สามารถใช้งานได้ดีกับแม่พิมพ์แบบนี้(จริงๆมันก็ไม่เหมาะที่จะเอามาก็อปงานแหละ)
เพราะเนื้อของมีความหนึดมากเกินนไป ไม่สามารถเข้าถึงดีเทลของแม่พิมพ์ยางชนิดนี้ได้

2 Polyester putty

ใช้งานได้ดีกับแม่พิมพ์แบบนี้แต่ยังมี ฟอง+รูอากาศ ปรากฏให้เห็นอยู่บ้าง ตรงนี้น่าจะ
ขึ้นอยู่กับทักษะของผู้ใช้งานและรูปแบบของแม่พิพ์ด้วย  แต่ถ้าไม่ซีเรียสอะไรเอาputtyอุดรูเอาทีหลังก็ได้

3 Rasin

ใช้งานได้ดีกับแม่พิมพ์แบบนี้แทบจะไม่มีฟองอากาศปรากฏให้เห็นเลย
(เนื่องจากชิ้นงานมีความใสอาจจะมองไม่ค่อยเห็นดีเทลจากรูปถ่าย แต่ของจริงดีเทลประมาณ97%-98%)

สรุปคร่าวๆถึงลักษณะของแม่พิมพ์ยางลบกึ่งสำเร็จรูปได้ประมาณนี้

1 เหมาะกับการก็อปปี้งานที่ชิ้นไม่ใหญ่มาก เพราะจะจำกัดอยู่ที่ขนาดของแท่งยางที่มีขาย

2 เหมาะกับงานที่มีดีเทลน้อยถึงปานกลางค่อนไปทางสูง (ถ้าต้องการดีเทลสูงมากคงสู้ยางซิลิโคนไม่ได้)
ถ้าเทียบกับซิลิโคน ผมให้การลอกแบบดีเทลชิ้นงานของซิลิโคนอยู่ที่99% ส่วนยางตัวนี้ผมให้ที่93%-95%

3 เนื้อยางที่เย็นและอยู่ตัวแล้วจะไม่ติดเป็นเนื้อเดียวกันกับยางที่ร้อนในกรณีที่ทำแม่พิมพ์ประกบสองชิ้น
ไม่ต้องห่วงเรื่องแม่พิมพ์ติดกันเหมือนแม่พิมพ์ยางซิลิโคน (ซิลิโคนต้องทางจำพวกวาสลีนหรือพ่นเคลียร์มันก่อน)

4 ก่อนต้มและหลังต้มไม่มีกลิ่นรบกวนเลย

5 สามารถนำกลับมาใช้งานซ้ำได้หลายครั้ง จริงๆนะ เราสามารถนำแม่พิมพ์ยางที่เราใช้งานไปแล้วนำกลับมาต้มเพื่อ
ก็อปงานครั้งต่อไปได้อีก หรือบางทีการทำแม่พิมพ์ครั้งแรกอาจจะไม่สมบูรณ์หรือมีรูโหว่ต้นแบบขยับหรือฉีกขาด
หรือก้อนยางที่เราตัดออกมาอาจจะมีขนาดเล็กเกินไปเราก็สามารถเอามาต้มแล้วนวดรวมๆกันให้เป็นก้อนใหญ่ๆได้
ตรงที่สามารถนำกลับมาใช้ได้ใหม่นี่แหละที่ผมชอบมาก

6 ตัวแม่พิมพ์ไม่ควรซับซ้อนเกินแม่พิมพ์ประกบ2ชิ้น แต่ถ้าใครใช้แล้วสามารถทำได้มากกว่านี้ก็ไม่ว่ากัน

อันนี้ของแถมครับผมทดลองก็อปมือของ  HGUC 1/144 GUNDAM MK-II  ดูครับ ผมใช้โพลีเอสเตอร์เป้นตัวทดสอบ
ผลออกมาก็ตามรูปที่เห็นเลยครับ
อันนี้แคะออกมาจกแม่พิมพ์สดๆ ยังไม่ได้ตกแต่งชิ้นงานแต่อย่างใดเลยครับ

เปรียบเทียบกับต้นฉบับ


ดีเทลต่างๆ เก็บมาได้เกือบครบ


ตะเข็บยังพอมีบ้าง รูก็พอมี อุดขัดนิดหน่อยก็ได้ล่ะ


ขนาดลายนิ้วมือผมยังโดนเจ้ายางนี่เก็บมาด้วยเลย


เก็บมาแม้กระทั้งรอยประกบของแม่พิมพ์โลหะ


ส่วนอันนี้ผมลองเปรียบเทียบคุณสมบัติของยางลบกึ่งสำเร็จรูปและยางซิลิโคนในรูปแบบตารางให้ดูนะครับ
ส่วนคะแนนที่ให้ ก็เรียงตามนี้ไปเลยครับ 4 ดีมาก 3ดี 2ปานกลาง 1เฉยๆ 0แย่


ฝากถึงสปอนเซอร์เวบด้วยครับ เจ้าไหนถ้าจะเอาเจ้ายางนี่เข้ามาจำหน่าย ช่วยหาก้อนที่มันใหญ่กว่านี้หน่อยเถอะครับ
ผมรู้สึกว่าก้อนมันเล็กไปหน่อยแค่มือของ 1/144 1ข้าง ยังใช้ยางทั้งซองเลยครับ(สองชิ้น)
สำหรับวันนี้ก็หมดแล้วครับ หาทางกลับไปจุดไฟทำโมให้ติดก่อนดีกว่า T_T*

*ส่วนรูปแม่พิมพ์ที่ทำเจ้ามือนีเดี๋ยวพรุ่งนี้จะถ่ายรูปมาเพิ่มให้ครับพอดีกล้องแบตหมดครับ*

สำหรับท่านที่สนใจในการค้นหาข้อมูลของเจ้ายางนี้ในกุเกิ้ล ให้ใช้คำนี้ ( おゆまる )ในการค้นหานะครับ
copy เอาไปแปะที่ช่องค้นหาแล้วเลือกที่อิมเมจเลยจะง่ายที่สุด มีหลายงานที่น่าสนใจด้วยนะครับ

*สุดท้ายนี้ใครที่รู้จักชื่อจริงๆของเจ้ายางนี่ช่วยบอกผมทีเถอะจะได้เรียกได้ถูกซะที*


**************************************************************
สวัสดีครับ กลับมาอีกครั้งสำหรับงานก็อปชิ้นส่วนด้วยยางลบถึ่งสำเร็จรูป

รูปนี้ใช้หนี้ของเมื่อวานเนื่องจากกล้องแบตหมดครับ
เป็นแม่พิมพ์ตัวแรกที่ทำการทดสอบครับ เป็นแม่พิมพ์ประกบแบบบ้านๆ

งานยังไม่ค่อยเรียบร้อยซักเท่าไหร่


**************************************************************

แม่พิมพ์ตัวนี้ทำขึ้นมาเป็นชิ้นที่สองหลังจากเก็บ EXP กับอันแรกไปพอสมควร ตอนนี้พอจะรู้ข้อดีข้อด้อยของวัสดุ
มากขึ้นกว่าเดิมทำให้ชิ้นงานออกสมบูรณ์ขึ้นกว่าเดิมทีเดียว

งานนี้ก็ยังเป็นแม่พิมพ์ประกบสองชิ้นเหมือนเดิมครับ จากงานทดสอบชิ้นแรกนั้นมีบางท่านเป็นห่วงเรื่องตะเข็บ
และการประกบไม่สนิทของแม่พิมพ์ ซึ่งวิธีแก้ไขนั้นผมพอที่จะทำได้แล้วซึ่งผลออกมาดีจนเป็นที่น่าพอใจ
สำหรับงานก๊อปชิ้นส่วน

ปัญหาของการเกิดเรื่องแม่พิมพ์ติดไม่สนิทหรือตะเข็บใหญ่นั้น เกิดมาจากเนื้อยางที่เราเอาไปต้มนั้นจะปูดขึ้นมาเป็นส่วนโค้ง

ดูตามรูปนะครับ


ซึ่งจะทำให้เมื่อเราทำแม่พิมพ์อีกชิ้นมาประกบนั้นมันจะไม่สนิทกัน ซึ่งจะทำให้เกิดตะเข็บใหญ่ที่ชิ้นงาน
วิธีแก้ไขก็คือเมื่อเราประกบชิ้นงานลงบนยางที่ต้มไปแล้วนั้น เราปล่อยให้ยางมัน ปูด ปลิ้น ทะลัก ขึ้นมาก่อน
จากนั้นพอเนื้อยางเย็นตัวลง เราค่อยๆเอามีดคัตเตอร์หรือ อาร์ตไนฟ ค่อยๆปาดแต่งเอาส่วนที่ ปูด ปลิ้น ทะลัก
นั้นออกไป

ดูตามรูปเลยครับ


จากนั้นเราก็เอายางอีกก้อนที่จะทำพิมพ์ประกบอีกชิ้นกดทับลงไป

ดูตามรูปเลยครับ


ในส่วนงานทดสอบชิ้นนี้ผมลองทำแม่พิมพ์ขึ้นมาอีกครั้ง โดยครั้งนี้ผมทำการปาดแต่งขอบของเนื้อยางออก
บางส่วนจากนั้นก็ กรีดเนื้อยากออกเป็นแนวสลักเพื่อยึดกับแม่พิมพ์อีกชิ้น เพื่อความแน่นหนาและแข็งแรง
ในการประกบกันของแม่พิมพ์ จากนั้นก็เอายางอีกก้อนที่ต้มเอาไว้แล้วมาประกบกัน พอแกะแบบออก
จากนั้นก็มีส่วนเสริมความแข็งแรงครับ จากการที่ทดลองก๊อปชิ้นส่วนเมื่อวานหลายๆครั้งพบว่า
ในส่วนที่มีความบอบบางต่อการหักเมื่อถอดงานออกมาจากแบบนั้น มันหักจริงๆเมื่อถอดแบบ
ผมเลยเสริมความแข้งแรงของชิ้นงานด้วยการตัดเอาปลายเข็มหมุดมาใส่เป็นแกนตรงบริเวณ
ที่เป็น Joint ข้อต่อของมือ จากนั้นก็เอา Polyester putty  ที่ผสมแล้วเทลงไปในแบบพิมพ์
ช่วงที่เรากำลังเทPolyester putty มีทริคอยู่นิดหน่อยครับให้เอาไม้จิ้มฟันเขี่ยๆคนๆเนื้อพุตตี้ใ
ห้เข้าไปในแบบให้ทั่วถึง จากนั้นก็ประกบกับแม่พิมพ์อีกชิ้น เนื้อพุตตี้จะทะลักหรือไหลเยิ้มออกมาก็ช่างมันครับ
เพราะเดี๋ยวถ้าเนื้อพุตตี้แข็งตัว เราต้องปาดทิ้งอยู่ดีครับ เดี๋ยวตอนค่ำๆค่อยกลับมาแกะแบบอีกที

ดูตามรูปเลยครับ


จากนั้นก็แกะแม่พิมพ์ออกมา ตามรูปจะเห็นได้ว่าพุตตี้ส่วนเกินนั้นจะไหลไปตามสลักที่เราทำเอาไว้
ส่วนที่ติดอยู่ตามส่วนอื่นๆของแม่พิมพ์นั้นจะมีความหนาประมาณกระดาษทิชชู่เท่านั้นตะเข็บน้อยกว่าเดิม
ชิ้นงานคมขึ้นกว่าของเก่าเยอะเลยครับ
ดูตามรูปเลยครับ


จากนั้นเราก็ทำการตกแต่งชิ้นงานเล็กน้อยปาดเอาตะเข็บออกเฉยๆ ยังไม่ได้ขัดด้วยกระดาษทรายนะครับ


เปรียบเทียบกับชิ้นงานต้นแบบครับ


จากนั้นลองเอาไปใส่กันแขนของโมเดลครับ ของพวกนี้ก๊อปทำออกมาแล้วถ้าเอาไปใช้ไม่ได้ก็จะไม่มีค่าอะไรเลย
ดังนั้นทำออกมาแล้วต้องใช้ได้จริงครับ ซัก90%ของของแท้ก็ยังดี ลองเปรียบเทียบกับงานแรกที่ทดลองก๊อปครับ
เนื้องานต่างกันเหมือน ฟุตบอล อบต. กับพรีเมียร์ลีก


พรุ่งนี้ผมว่าจะลองทำแม่พิมพ์ประกบแบบสามชิ้นโดยมีเจ้านี่เป็นต้นแบบครับ

ยังไงก็ติดตามกันต่อนะครับ


*********************************************************

กลับมาอีกครั้งแล้วครับ ตามสัญญาเมื่อวาน

สำหรับการทำแม่พิมพ์สำหรับก๊อปปี้ชิ้นงานจากยางลบกึ่งสำเร็จรูป
คราวนี้เป็นแม่พิมพ์ประกบแบบสามชิ้นแบบบ้านๆ

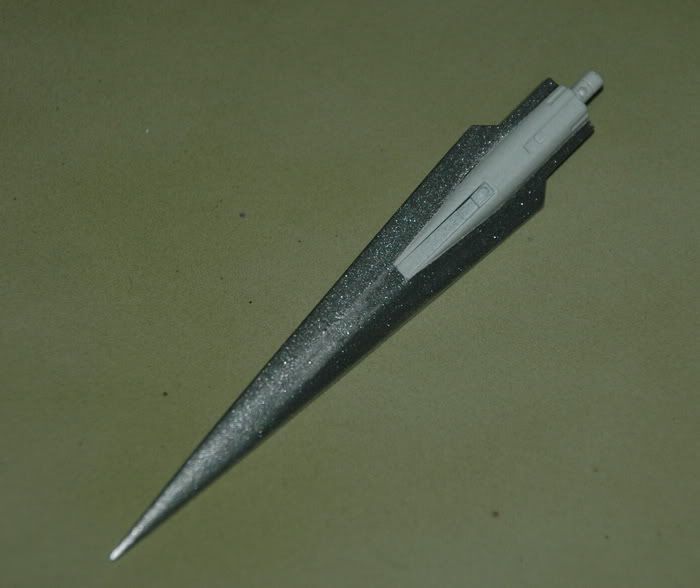
สำหรับต้นแบบคราวนี้คือตัวท่อ Thruster ของ HGUC ZAKU-III
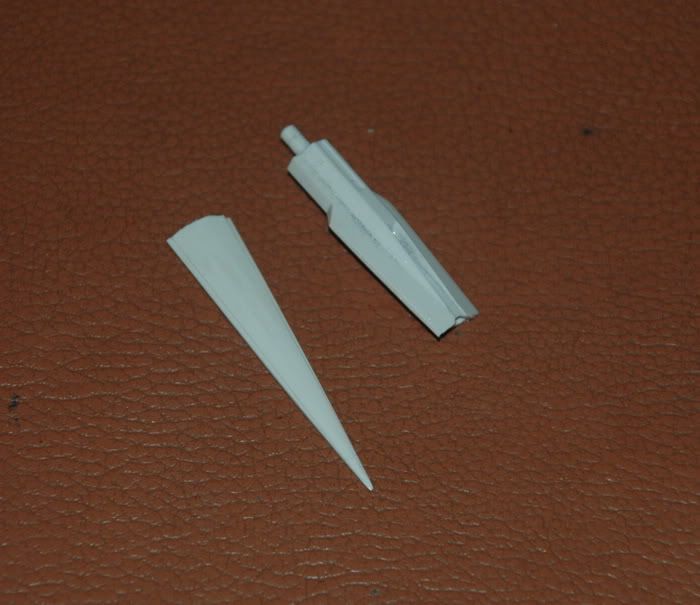
สำหรับงานแม่พิมพ์คราวนี้เริ่มจากทำส่วนท้ายก่อนครับ ตรงที่เป็นเลข1
เอายางที่ต้มแล้วอัดเข้าไปทางด้านท้ายของตัวต้นแบบ พอยางเย็นตัวลง
เราก็เอามีดคัตเตอร์ปาดแต่งขอบชิ้นงาน เพื่อให้มีผิวสัมพัสที่แนบสนิทกับแม่พิมพ์ชิ้นต่อไป
จากนั้นก็เอายางที่ต้มแล้วมาโปะเข้าไปในส่วนที่2 พอยางในส่วนที่2เย็นตัวแล้ว ก็ปาดแต่งขอบ
ที่จะสัมพัสกับแม่พิมพ์ในส่วนที่3 จากนั้นก็เอายางที่ต้มแล้วมาโปะลงในไปพื้นที่ที่เหลือ
จากนั้นก็รอให้เย็นลง
ตามรูปเลยครับ


เสร็จแล้วเรามาแกะดูแม่พิมพ์ทั้ง3ชิ้นกันครับ
หน้าตาเป็นแบบนี้ครับ


จากนั้นเราจะเริ่มทำการเท Polyester putty ลงไปในแม่พิมพ์
ก่อนอื่นเอาแม่พิมพ์ส่วนที่2และสามมาประกบกันก่อน แล้วเอามาสกิ้งเทปหรือเทปใสก็ได้
แปะเอาไว้กันแม่พิมพ์ขยับ ตรงปลายส่วนที่เป็นก้านของ Thruster นั้นผมไม่ต้องการเท่าไหร่
เลยเอาดินน้ำมันอุดเอาไว้ จากนั้นเราก็เท Polyester putty ลงไปในแม่พิมพ์ที่ประกบกันไว้
จากนั้นเอาแม่พิมพืชิ้นที่1ดันเข้าไป จะมีส่วนของPolyester puttyที่ล้นเกินออกมาก็ไม่เป็นไรครับ
เดี๋ยวค่อยปาดทิ้งก็ได้
หน้าตาก่อนเทส่วนผสมเป็นแบบนี้ครับ


จากนั้นก็มาแกะแบบครับหน้าตาของชิ้นงานเป็นแบบนี้ครับ


ตะเข็บส่วนเกินมีตามปกติเดี๋ยวค่อยปาดออก


อันนี้คือที่ปาดส่วนเกินออกมาแล้วครับลองเทียบกับตันแบบดูครับ


ที่มา : http://www.thaigundam.com/forum/index.php?topic=16046.0